I’ve always thought there was a big secret that everyone who takes great low-light, long-exposure photos knew that I didn’t. I figured that was probably a tricky technique or maybe something only fancy cameras could do, until I did some research and played around with my camera settings and I realize it wasn’t rocket science at all.
There’s no big secret, and taking great low-light shots comes down to two things: the right settings and the right gear.
For any kind of low light shots you of course need a camera (<– captain obvious). Phones don’t work very well in low light and nothing in this article involves flash, as I think it’s the ruiner of landscape photography.
Most DSLR cameras will do in low light, and everything in this post was shot on my Sony a6000 with a wide angle lens (although the lens has nothing to do with being able to take pictures). low light photos. It’s just the one I use and love the most). I also recommend a cheap tripod from Amazon. (You can find the rest of the gear I use here).
You also need to be able to see what you’re doing and then be able to easily turn that light off so the light doesn’t wash out the foreground of your photo. In this case, I almost always use a headlamp to keep my hands free.
For this article, I’ve also teamed up with VARTA Consumer to show you a few other little tools, such as battery-operated string lights, an adjustable waterproof headlamp with multiple settings to help in fog, low light, and darkness. total (I also use it for hiking and camping!), and lightweight LED lanterns which can all help make a low-light shot even more magical and ethereal.
Let’s talk about settings first
The reason you need a tripod or something sturdy to balance your camera with when shooting in low light is because the camera needs to be completely still. This means that you should also set a timer when taking the photo so that the movement of your hand while pressing the button does not cause the camera to move while it takes the photo. You can also use a remote or even your phone if your camera is able to connect to your phone (mine is).
In manual mode, you can change the settings for three main things when it comes to your low-light photos:
- Aperture is the F-stop and the number will decrease as the outside light decreases. For example, at night you will probably want an F-4 or less.
- Shutter speed This is the length of time the shutter is open to take the photo. It will lengthen as it darkens and that’s why it’s important not to move the camera or anything you’re shooting unless you want it to move to create a cool effect, like water.
- ISO has to do with your camera’s sensitivity to light. The lower the number, the less sensitive your camera is to light, which basically means that in low light conditions you can let more light into the photo, but it also increases ‘noise’ or grain. of your picture.
Here are some examples and my settings for each:
If it’s cloudy
Sometimes clouds can ruin a perfect summer day, but I often find they can help make a photo better as long as you know how to make cloudy weather work for you.
I’ve been to Lago di Braies in South Tyrol, Italy twice, but it’s totally normal to have some cloud cover there. That’s okay, because the color of the lake is so gorgeous that it doesn’t need to compete with blue skies.

For this photo, I placed my camera on a tripod and set it to F14, ISO 100 and an exposure of 10 seconds. I also set it on a 10 second timer and went to stand in the photo. You can see that my shirt, my hair and my left hand have moved slightly. I’ll blame a slight breeze for the first two numbers, but I’ll admit I had to move my hand.
I love the glassy look of the water in this photo and recommend this setting if you want the water to look like haze in your photos in low light situations (during daylight you will need of a filter, but that’s another post topic entirely).
If it’s blue hour
Blue hour is the time before the sun rises in the morning or after it sets in the evening. If you’re near water, now’s a great time to take an ethereal night shot that makes the water look hazy without the need for a filter to combat the excessive light coming in.

About 30 minutes after the first photo in this article, I hung some VARTA Consumer lights, turned on a headlamp, and placed some of the smaller LED lights to make the photo even more magical. I love how adding a few lights to a photo can really warm it up even if it looks dark and cold. It can be a complete game-changer by making an otherwise dark image feel more warm and inviting.
I changed my settings to F4 (to let in more light), ISO 100 and 20 seconds. Again, I had to stay very still for the photo.
Tip: If you want to be in the picture, step away from the camera and use a friend or remote to take the picture for you. That way, even if you move a bit, it won’t be as obvious.
Additionally, headlamps almost always make night photography even cooler by adding a warm trail to the photo and making it shine in the distance.
If it’s almost completely dark

When the sun has completely set and there’s almost no light left, you’ll want to find a way to illuminate the subject you’re shooting, unless they have their own light.
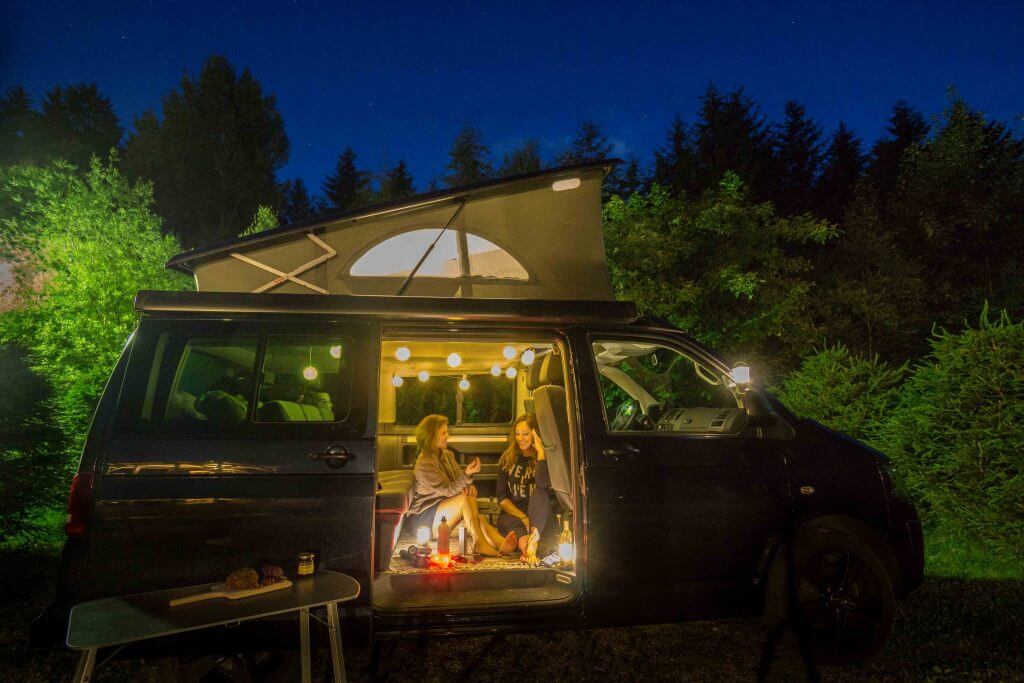
I do this either by flashing my headlamp light in the direction of my subject for about a second or by adding light to the image like I did with the string of lights in the camper. because, plus the lanterns inside the van and in the rooftop tent for this photo.
Since there was already so much light in the foreground, I put my camera on a tripod, 10 second self-timer and F2.6, ISO 2000 and 6 second exposure. We had to reshoot about 10 times as we kept laughing at each other and fidgeting during the shots.
If I’ve learned anything, it’s that low-light photos aren’t usually quite right the first time around, but do some experimentation, trial and error.
Of course, it always helps if your subject is beautiful, as it certainly is with South Tyrol, Italy. For more on my favorite places to hang out and photograph, read this next.
*This article (obviously) has been brought to you in collaboration with Visit South Tyrol and VARTA Consumer. I love how the battery powered lights make my photos so much cooler and my reviews of products and locations are candid. Your trust always comes first.

